|
|
 07-31-2009, 09:47 AM
|
#1 |
|
Member
Join Date: Oct 2008
Location: Tucson, Arizona
Posts: 91
|
New Cobra light bar
All-
I ordered my Cobra lightbar last week, part number 04-0442. In my anticipation, I looked up the installation instructions, which state the bar is attached to the bottom of the triple tree where the current bar is attached. I get the new part yesterday, and the mounting bracket is on the side and looks like it should mount in the windshield holes on the forks. Wont that interfere with removal of the windshield and make you remove the lightbar too? I dont want to open the package until I know that this is the correct one. Anyone with this lightbar help me out? Login or Register to Remove Ads |

|
|
07-31-2009, 10:18 AM
|
#2 | |
|
Mega-Contributor

Join Date: Sep 2007
Location: Where it doesn't snow...ever!
Posts: 21,926
|
New Cobra light bar
Quote:
"4. Install the light bar under the lower triple clamp in the same holes as the stock light mount using the supplied M6 bolts." There's no illustration in the .pdf file, so I haven't a clue. I have the CWI billet mount lights, which are not a lightbar at all. Sorry I couldn't be more help.
__________________
Scott "Cactusjack" Hanks VBA #00105 H.O.G. #4250060 2011 H-D Ultra Limited 103ci  :: 2011 HD Electra Glide Ultra Limited w/Stage 1 :: Rallies: Mesquite '08|Custer '09|Cortez '10|Crescent City '11|Kanab '12|Antlers '12|Estes Park '13|Antlers '13|Orofino '14|The Dalles '17 |
|
|
|
|
07-31-2009, 10:53 AM
|
#3 |
|
Sr. Member
Join Date: Feb 2008
Location: Charlotte, NC
Posts: 1,464
|
New Cobra light bar
I have the Cobra light bar on my 07Nad. It is Pt. # 04-0442 and it has the identical flat bracket mounting points that your OEM turnsignal light bar has. You take your head light out unplug the turn signal wires, unbolt the turnsignals from the OEM bar and remove, fishing the wires backwards out of the bar. Then unbolt the OEM bar from under the triple clamp and hold it over by your package from Cobra. If those flat mounting brackets don't match call cobra about getting the wrong thing. If they do match open the package and transfer the rubber feet with metal sleaves and the wire loom from your OEM bar to the Cobra bar. Bolt the Cobra bar back up to the bottom of the triple clam in place of your OEM turnsignal bar. Make sure you put your bike's cable/hose back in the loom. It's mounted now.
The rest will be deciding how to power your lights and where you will route your wires. There are a ton of opinions about that part of the installation and it will be driven by your capabilities. I have put three of these bars on Nads. Some helpfull hints: I splice 6-9 inch extensions (with soilder and shrink tube) in all the turn wires under their black sleave. This allows easier installations and safer wire routing. I also use my own heavier spool of black wire for the power lead and switch jumper because they supply wire that is too small diameter and too short. Good Luck!
__________________
trosco: just call me Ross 2007 Black & Titanium Nomad (Nomad made 65K but got replaced 2014) 2010 Titanium Goldwing 2014 KLR 650 New Edition |
|
|
|
07-31-2009, 11:37 AM
|
#5 |
|
Jr. Member
Join Date: Jan 2008
Location: Fredericksburg, VA
Posts: 46
|
New Cobra light bar
Trosco,
You seem to have good experience with the lightbar installation. On another thread, I posted my disgust with my dealer's installation of my lightbar, which routed the wires from the bar around the outside of my forks, then up into the rear of the headlight bucket. I HATE THE WAY THAT LOOKS, and would really know another option for routing the wires so I don't see them. Can you help me out here? What suggestions do you have? Thanks in advance. Reg Login or Register to Remove Ads |
|
|
|
07-31-2009, 01:10 PM
|
#6 |
|
Sr. Contributor

Join Date: Apr 2008
Location: Tamworth New Hampster 06 1600
Posts: 12,484
|
New Cobra light bar
They must have 2 bars with the same part number...
i just installed one nothing like that, and it mounts with the same bolts the lowers mount too! The stock bar bolts are not used to hold the Cobra bar on at all. The info sheet says to remove one of the stock bar rubbers and sleeve to put back and hold the brake line support. The same bolts on the lowers work well enough and are not too short for the bar and the lowers... There is clearance for adjusting the windseild though, and you will not touch those bolts for this install, unless you have reasons of your own. The lowewrs bolt on Cobra unit has a switch placed on the far right, and a very strange place to have one. I added an illuminated switch there over the Cobra one, so i could tell when the lamps were on. The switch would be better on the left than on the right, and either way it would be better else where, if you plan to use any switch in the first place. I do because i wire to have lamps with or with any engine... Light any time I want hey or no key. The info sheet says to run the wires around the back side of the forks too. I did, and i don't like it one bit, and plan to move the wires my own way some other time. The wires from the sigs just make it into the bucket, and I don't like that either. The type of bar I have with this same number has a holes forward of the sig stem adapter and so is in the wrong place so far as i am corned, and the lead wires head back after going forward. When I re-do the wiring I will have some chrome plastic wire loom on hand and run the wires close to the stock location. If these lamps have 55 watt bulbs you can not just stick the wires into the white and blue acc wire, that will be almost a full blown over load just below 10 amps draw.. You will need a direct line with a fuse to the battery maybe switched, or a relay set up more common around here. If you plan to use lesser watts like yellow in 35 watts each then you may use the acc wire and a switch as that is 6 amps + a little bit. In oder to do so you will find the shoelace grommets will only allow one single wire,, and will have to ground the yellow glass back bulb some other way. One way is to run a pig tail as ground off that type of sealed beam to the lamp bucket bolts out side the bucket. Another way is to haul out th shoelace grommet, and drill the hole bigger and feed the ground back to the fork frame anywhere you want and bolt it down. I am really confused about the same part number with 2 different seeming bars.....
__________________
 06 1600 Nomad Just call me Mac molon labe come and get it |
|
|
|
07-31-2009, 02:26 PM
|
#7 |
|
Member
Join Date: Oct 2008
Location: Tucson, Arizona
Posts: 91
|
New Cobra light bar
Here is the lightbar, pn 04-0442 which is stamped on one side or the unit. So apparently there are indeed 2 types. I called Cobra, the guy asked me to verify the PN stamped on the switch side, and he says that that is the right one for the Nomad.
It is kind of cheesy the way the directions say to route the spotlight wiring. They give you tie wraps to tie the wire from one light to the lightbar switch on the other side across the light bar. I am going to re-wire the lights with longer and heavier gauge wire and run it through the bar. The turn signal wiring will be a different matter. 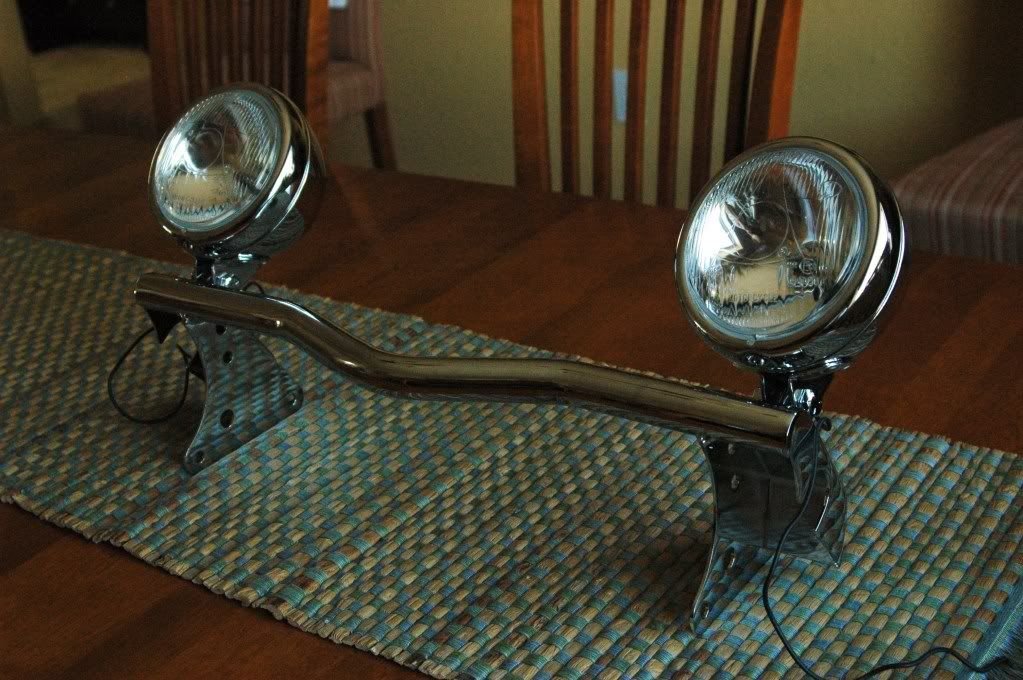
|
|
|
|
07-31-2009, 03:01 PM
|
#8 | |
|
Mega-Contributor
Join Date: Sep 2007
Location: Where it doesn't snow...ever!
Posts: 21,926
|
New Cobra light bar
Quote:
Wow, that's kind of a cheeseball setup.
__________________
Scott "Cactusjack" Hanks VBA #00105 H.O.G. #4250060 2011 H-D Ultra Limited 103ci :: 2011 HD Electra Glide Ultra Limited w/Stage 1 :: Rallies: Mesquite '08|Custer '09|Cortez '10|Crescent City '11|Kanab '12|Antlers '12|Estes Park '13|Antlers '13|Orofino '14|The Dalles '17 |
|
|
|
|
07-31-2009, 03:39 PM
|
#9 |
|
Sr. Contributor
Join Date: Apr 2008
Location: Tamworth New Hampster 06 1600
Posts: 12,484
|
New Cobra light bar
Here is a link to the pdf instructions Scott. They suck
http://www.cruisercustomizing.com/in.../BLV4-0442.pdf Over all the bar is very nice and nicely chromed IMO. This is the very one I have installed yesterday. This was a trade deal and not new out of the box, so I didn't get every part exactly. If possible I would like a clear pic of everything in the box.. trosco has things just about right if you ask me. The first thing i would do is get the bar ready, which it really is. You will want 6 pieces of wire to add in on the turn signals his stated 6 to 9 inches.. No more and no less. I haven't seen the Cobra wire set, so I can only guess trosco is right by using larger wire and running it some other way to a direct in-line fuse to the battery and or with a typic relay set up depending on how you want the passing lamps to work. I would think long and hard about which types of lamps you may want to use in the future. The set you have now have a weasely thin wire that will be a snug fit thru the shoelace grommets. No other real wire will pass and if you want a invisable ground for a sealed beam the grommets must go, and the hole drilled out. The best way to drill these holes out is at first to use sizes to close but not the final size and use a step drill. Scott (Cj) can tell you all about how nice a step drill cuts. Just don't try it as the first and only Bit. If I were you I would buy a some sort of indicator lamp to place in the switch hole too. What a foolish place to create a hole.. I can't get over that one. With a indicator lamp in the hole, you can tell better in day light if the lamps are on or off. I am seeking another way to run the wires myself. One way will be yank the whole thing and all the wires off I made, and get some chrome wire loom. I don't want to see that stuff really but it is better than a size 12 boot in the butt. When I get it right you won't see much if any either, but that will take a bit of doing. I was missing the turn signal adapters when the bar arrived, so i made some up and came very close to the Cobra sets, sight un-seen. Mine are nearly an exact match other than being 3 inches long instead of Cobra's 2.5". Because the instructions say to run the wires to the only hole on the side brackets not used, I did, and then slipped them back thru the brackets and the forks as they say. Since I have another set of 55 watts each lamps on my lowers i ran the wires with them. This is wild now since on the left fork 2 wires in a tape neat harness got 3 more wires taped nice as a harness, and the switch side has that plus 3 more for the switch. I ran real grounds, and made up longer harness for the passing lamps than is ever going to be needed, knowing I would make it different later. There is a coil of taped neatly harness inside the face cover for the forks, where I picked off a good bolt to get ground. Once I get chrome loom I will alter if I must some way to feed it into the face cover, close to the forks, and not so far out as the places the OEM bar fed the turn sigs thru. Scott every hole in the end brackets you see is used. 2 are for the lowers chrome and are a dead match for the lowers bolt holes where it take 3 hands to install the brackets over the lowers chrome. The larger hole is for clearance over a bolt in the forks. The 2 most forward holes are to run wire thru the most forward hole of all and the turn sig adapter is bolted to the next hole back. Once the bar is bolted on it mounts up solid.
__________________
06 1600 Nomad Just call me Mac molon labe come and get it |
|
|
|
07-31-2009, 03:49 PM
|
#10 | |
|
Member
Join Date: Oct 2008
Location: Tucson, Arizona
Posts: 91
|
New Cobra light bar
Quote:
The wiring is not even hidden, might hide some in the tube itself. There are a couple of holes. Im not to impressed with this, I think I should contact Phat Performance. |
|
|
|
|
07-31-2009, 04:10 PM
|
#11 |
|
Sr. Contributor
Join Date: Apr 2008
Location: Tamworth New Hampster 06 1600
Posts: 12,484
|
New Cobra light bar
I was typing more info.... you would have missed seeing it, as we cross posted.
Yeah I saw the semi cresent holes too. I wouldn't run wire thru them on a bet. If you want to drill a hole big enough to set a grommet in under the bar tops and near the cresents.. With a computer vacuum suck a string from one side to the other other, and then pulling wire thru will be easy. But that could mean you plan to run the left sig wires all that way and that would make a really long run of wires. The problem isn't Cobra really but the Nomad is more like it, with no good way to bury wire there, unless I missed something.
__________________
06 1600 Nomad Just call me Mac molon labe come and get it |
|
|
|
07-31-2009, 04:11 PM
|
#12 | |
|
Member
Join Date: Oct 2008
Location: Tucson, Arizona
Posts: 91
|
New Cobra light bar
Quote:
The blue deal is a way to splice into the running light curcuit. the blade connector is to attach the lights to the switch. The tie wraps are to tie the wire to the bar. The aluminum "stand offs" are to attache the blinkers. ( they have slots in them for the wires, hard to make out) in the pic Were you able to route your wires through the small openings in the bar? 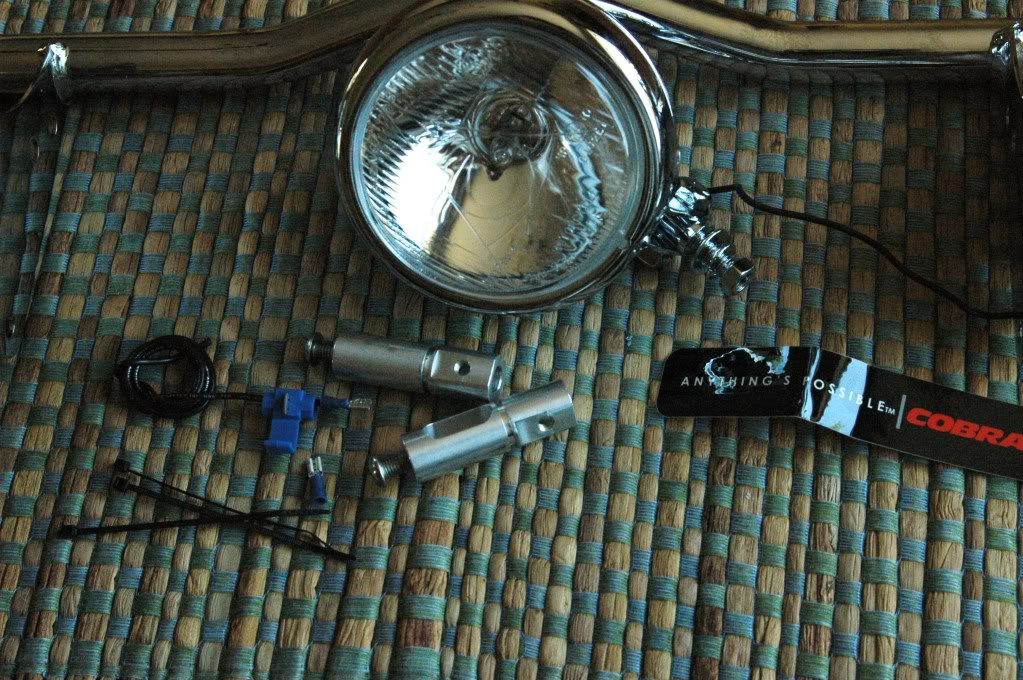
|
|
|
|
|
07-31-2009, 04:11 PM
|
#13 | |
|
Mega-Contributor
Join Date: Sep 2007
Location: Where it doesn't snow...ever!
Posts: 21,926
|
New Cobra light bar
Quote:
I just checked the item on Phat Performance Parts website and it does say that the lightbar attaches over the top of the windshield brackets. So it must be Cobra that has old or incorrect info on their website.
__________________
Scott "Cactusjack" Hanks VBA #00105 H.O.G. #4250060 2011 H-D Ultra Limited 103ci :: 2011 HD Electra Glide Ultra Limited w/Stage 1 :: Rallies: Mesquite '08|Custer '09|Cortez '10|Crescent City '11|Kanab '12|Antlers '12|Estes Park '13|Antlers '13|Orofino '14|The Dalles '17 |
|
|
|
|
07-31-2009, 04:23 PM
|
#14 |
|
Sr. Contributor
Join Date: Apr 2008
Location: Tamworth New Hampster 06 1600
Posts: 12,484
|
New Cobra light bar
dolanz, Thats it? No longer 8mm allen caps screws huh! I wasn't sure if they would give you the lowers screws 6mm longer than stock. I guess not, but the stock screws with do.
Yeah I made a set of the adapters by guessing and mine are exactly 1/2 inch longer, with the wire slots up and forward aimed at the last hole. Milled for the O ring too. You are supposed to get the sig wires all 3 and the lamp wire thru that hole, and the 2 stock switch wires as well. I did, but just barely and had no room left for the real wires off the lamp. Note I added a real ground wire. I like bigger wire than I need and have a big gob of wire left over from working on industrial vacuum ovens a man can walk it to.
__________________
06 1600 Nomad Just call me Mac molon labe come and get it |
|
|
|
07-31-2009, 04:24 PM
|
#15 |
|
Sr. Contributor
Join Date: Apr 2008
Location: Tamworth New Hampster 06 1600
Posts: 12,484
|
New Cobra light bar
Scott there is a stink in Denmark some where, or there is 2 different bars with the same numbers and the numbers reported here are stamped into the bottom of the left side bracket.
__________________
06 1600 Nomad Just call me Mac molon labe come and get it |
|
|
 |
|
|
 Similar Threads
|
||||
| Thread | Thread Starter | Forum | Replies | Last Post |
| Cobra light bar issue | rickyboy | 1500 & 1600 Nomad | 11 | 08-16-2010 04:50 PM |
| Cobra light bar for the 1700 Nomad | jevans43 | Vulcan Nomad/Vaquero/Voyager | 7 | 03-07-2010 01:20 AM |
| Cobra Light Bar Relay Switch | cheriann | 1500 & 1600 Nomad | 27 | 09-15-2008 01:46 PM |
| Cobra Light Bar Install Question | 1500 & 1600 Nomad | 13 | 05-10-2008 09:42 PM | |
| Kawaski Light Bar VS Cobra | Vulcan Nomad/Vaquero/Voyager | 13 | 03-09-2008 04:08 PM | |


 Linear Mode
