|
|
 12-31-2016, 12:55 AM
|
#1 |
|
Member
Join Date: Jun 2016
Location: Halifax, Nova Scotia
Posts: 93
|
Nomad Build Story - Part 1
Nomad Build Story - Part 1
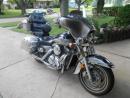
In this series of threads I'll be telling the story of my green 1999 Vulcan Nomad - how I ended up buying it, what I did to it, and what became of it. This will be more of a build story than a build log, for a couple of reasons. First, I'm writing this months after the fact, and I don't necessarily remember the order in which everything happened. It would take a lot longer to sort out all those details, and I don't think they would really add anything of value. Second, most of what I did is fairly standard stuff so I don't think including everything would be all that interesting anyway. Third, everyone likes a story, and I hope people enjoy reading it. Finally, I'm doing it for myself. All this happened in a bit of a rush as the season was quickly getting away from me. The process of looking back at threads, notes, and pictures, and then trying to put it together helps me sort out what happened and gives me a chance to reflect on it and learn. The format here will be the story of how I did things, not instructions on how other people should do things. I don't feel qualified to do that. What I found helpful when learning these things for myself was finding several sets of instructions and examples of people doing whatever it is. There's always a bit in one that isn't in any of the others, so that's what I'm hoping to add to here. I think it would be most useful to someone like me just starting out, but I hope it's interesting enough for everyone to enjoy. The story starts here in my introduction thread. It's interesting to see how my plans at the beginning compare to what actually happened. The idea originally wasn't to do a full teardown - from what I could see the bike was in great shape for the year. As it turned out though, what I couldn't see was a lot of problems and neglected maintenance. As I got into it, I found more and more things that should be done, and a couple of things that needed to be done. In the end, it would've been faster and less work to just strip the whole thing down from the start. But that's looking back on it - that wouldn't have made any sense at the time. For instance the degreasing and cleaning would've been much easier to do with it all torn down. I also would've been able to find more of the problems up front and waste less time waiting for parts one issue at a time. In the help thread that I started, you can see how the small project kept getting bigger and bigger. I'm doing this series so that I can give back to the community for all the information, help and support I got. Specifically a couple PMs I got from people were very encouraging and it was really nice to realize that people were interested in the project and wishing me well. I'll try not to duplicate too much of what was in that thread, but some of that will be necessary for the story. Also keep in mind that I'm writing this months after the fact so I may remember things a bit out of order. I didn't go into every detail of what I was doing and why in that thread, so it probably didn't make much sense to people who have been familiar with this bike for twenty years. I was replacing a bike that had been lost in a wreck, and hoped to get it on the road for the summer and then do the major work the following winter at a reasonable pace. It wasn't originally my intention to do a full rebuild in the spring and summer and miss the majority of a short riding season, but that's what ended up happening. I dealt with issues the best I could as they came up. The Vibration in the Front End The first things to do were the very basics - oil, plugs, and brakes and that sort of thing. On my first ride after that, I did something that I didn't happen to do on the test ride: turn while going downhill. This revealed a vibration in the front end that I didn't know was there. My second ride on it revealed a wobble in the front end when I lifted my hands off the bars. Testing showed a flat spot in the steering head bearings. That, plus the issues with the exhaust that I'll talk about in the next thread, lead to the bike being setup like it is in the picture. When I asked for help with this and the other issues, the first thing everyone said was to look into the POG. With help from the forum I compared the shape of the sidecover to the diagrams. The one I had matched the version that wasn't supposed to have the POG. Also the previous owner, who bought the motorcycle new told me it had been fixed under warranty, which was one of the reasons I bought the bike in the first place. All this was indicating that I most likely didn't have the POG, but I still wanted to check it out. However, the way the bike was set up on the jack meant that I couldn't open the side cover. It would have to wait until the rear wheel was back on, and the front end of the bike was supported by something other than the engine. While looking into the vibration issue and the bearings, I also noticed that the forks didn't seem right at all. By this point I could tell very little maintenance was kept up so it was easy to decide to rebuild the forks. Putting progressive springs on my Virago was the single best thing I did for that motorcycle, so I got some for the Nomad, too. Rebuilding the forks went pretty well because I knew what to expect, since I did them on my old bike. The only thing worth mentioning here is the sweet wooden vice I made that you can see in the picture. That thing worked really well and I ended up using it quite a lot, especially on the exhaust. I rebuilt the forks, set them aside and moved on to the steering head.
__________________
1999 VN1500 Nomad - Death by POG Login or Register to Remove Ads |

|
|
12-31-2016, 12:56 AM
|
#2 |
|
Member
Join Date: Jun 2016
Location: Halifax, Nova Scotia
Posts: 93
|
The Steering Head
The way neck is designed, it's not easy to get purchase on the bearing races with a drift to get them out. Trying to figure this out was one of the more difficult things about the build. I found several approaches online. One was to get the special tool, but that would've taken too long to arrive. There was a DIY version but I didn't have the means to make it. Another option was to weld a tab to the race and use it to drift it out. I don't know how to weld, and I didn't know anyone who could come do it. I wasn't able to take the frame anywhere becuase the wheels were off but the engine was still in it. Another option was to carefully cut it with a dremel and then crack it in two. I barely know what I'm doing here so I wasn't really comfortable hacking away at my frame with the dremel, but since I didn't have any other options I gave it a go. I carefully started cutting away at the upper race. It didn't take very many accidental nicks into the frame for me to abandon the idea. I didn't want to make things worse. Following a suggestion I read somewhere, I made a little 'V' notch for the drift to get better purchase. With the help of a friend we were able to drift them out by putting pressure sideways into the drift to keep it against the tiny little bit of the race that it had access to. Putting the front end back together wasn't too bad. The difficulty here was setting the forks at the right height with respect to the triple tree. According to the manuals, they're to be set at a certain depth in the clamp of the top triple. I think it was 1mm or so, but I remember a conflicting source having them set flush. The problem here is that the distance that the fork is allowed to go upwards is limited by the part that Kawasaki calls a fork cover. That chrome tube hangs is held up by a clamp that attaches to the fork tube itself. There is a spec for the distance from the top of the tube to that clamp. However, on one of the forks, even after setting it to the right distance, the top of the tube ended up out of spec with the top triple. I'm sure there was a right way to do this. The way I did it though, was to take the forks on and off the bike about seven hundred times and adjust the clamp by trial and error. There was information on the forum about getting a special washer to go under the steering stem nut because for some people, that nut was bottoming out and not torquing properly. The price online for Canada was pretty expensive for some reason. Someone in the thread told me to check out bearing supply shops locally. I found a shop that was able to order it for me, and this part was pretty cool because I got to talk to an expert about bearings and learn a few things. In the end I didn't need the washer, though. I also learned quite a bit trying to make up the socket for torquing the steering stem nut down to spec. I went through two Princess Auto 38mm impact sockets, which you can see in the pictures. The first socket I used wasn't deep enough, which was fine becuase that gave me the chance to do a better job making the second one. Didn't really know what I was doing here but I worked away at it with cut-off wheels, grinders and files for what seemed like hours until I got it right. It worked great and now I have a tool that does one very specific thing and nothing else. The top triple itself had a bit of a story, too. One of my problems on the Virago was that the bars were way too low and I always wanted risers but didn't get a chance to do them before I lost the bike. The Nomad was better in that sense but still not quite right. I wanted to get the ones from Scootworks that everyone seems to like in the winter. In the meantime I bought some 'affordable' ones on eBay. They were garbage. Their stems were too big so after boring out the holes with a hand drill, I dropped them in to find one was crooked. At first I figured I had done a bad job on the drilling. My holes ended up pretty square so it was the riser's stem that was crooked - by a lot. I tried to use another set of risers that I had gotten second hand. They were slightly taller than the Nomad ones, but their stems were too long and not threaded all the way up. I want to learn how to do this stuff, but I just don't have the tools, so I had a shop do it. He plugged and re-drilled the holes in the triple that were now too big. For the length issue he said making a spacer instead of re-threading would be cheaper and asked if there was clearance to do it that way. Picturing it in my head I told him it would be fine without really checking. What I didn't think of was what would happen when the bars were moved. I should have checked, and so after all that I had to go back to the stock risers because I just wasn't going to spend any more money on it. The driving lights that came with the bike didn't look right after I made it solo, so I got a normal turn signal bracket. They they weren't very powerful anyway. I had an idea to modify a second set of turn signals and make them into HID driving lights. I thought it would look nice doubled up like that. When I got the bike all back together I was pretty disappointed to find out the vibration was still there. It was a lot better, but definitely still there. Later on I would work on the brakes and end up completely rebuilding them and it still didn't go away. I resurfaced the pads but didn't get new ones becuase they were still quite thick. It feels like a constant oscillation, so that makes me think it's to do with the front wheel. Maybe when the bike leans over and the forks are compressed, something is allowing the pads to fall onto the rotors.
__________________
1999 VN1500 Nomad - Death by POG |
|
|
|
12-31-2016, 07:47 AM
|
#3 |
|
Join Date: Oct 2013
Location: chandler okla
Posts: 854
|
I enjoyed reading this Post and will continue to Follow . V Scott ! PS this will go along way on helping folks as They learn and personalize There Machines .Experience is Expensive so Like You before Starting a project I read Every ones posts on the subject !
Last edited by vulcanscott; 12-31-2016 at 07:53 AM.
|
|
|
|
12-31-2016, 09:37 AM
|
#4 |
Join Date: Sep 2011
Location: Ankeny Iowa
Posts: 3,694
|
Thanks for sharing your story on here. Keep us updated on your project
__________________
VROC#34321 VBA#01867 2012 NCR Rally Savanna. IL. 2013 National Rally Estes Park, CO 2014 NC/SC Rally in the Ozarks, Mountain View AR 2014 NE US/Eastern Canada Rally,Lincoln NH 2015 VBA/VRA Eureka Springs AR 2015 Antlers Rally, Antlers OK. 2016 SCR Rally Salem MO. 2016 NCR Rally Hillsboro WI 2017 Eureka Springs AR 2017 National Rally Lake George NY 2004 Blue and Silver 1500 Nomad(RIP 9-26-19)  2000 Red and Silver 1500 Nomad  2012 Pearl White 1700 Voyager 
|
|
|


 Linear Mode
