|
|
 03-29-2008, 04:43 PM
|
#1 |
|
Mega-Contributor

Join Date: Sep 2007
Location: Where it doesn't snow...ever!
Posts: 21,926
|
First peek at my latest work-in-progress
As I've mentioned before, I have been working on some custom light brackets for awhile. My imported Canadian lights came in last week, and I had time to install them today. The brackets didn't turn out as well as I'd liked, and to be honest, I built them scaled for a different (larger) set of lights. I didn't like the looks of the lights, so I found these and ordered them, with the brackets already built. So these lights, being smaller, look a little odd on these brackets. I plan to order some more aluminum angle and build a more suitable pair. Therefore, I consider these brackets a prototype and not the finished product. The new ones will be up to my usual quality standards.
Since I wired in a 6-fuse accessory block a couple of months ago, all I had to do to connect up these lights was pick an unused wire from the harness I ran into the headlight bucket and run a wire to each of the lights, connect all 3 up in the headlight bucket, and pop a fuse in the fuse block - very slick. I went to West Marine this morning and bought another marine-grade toggle switch, but I also stupidly filled my tank, so I didn't want to wrestle a tank full of gas to install the switch. For now, they turn on and off with the headlight. I'll add the switch next weekend. As you will see, I also still have my Optronics lights mounted on the crash bars, and they will remain there. Overall, I think they proved I could do it (thanks, Bdog!) and they will be very functional. 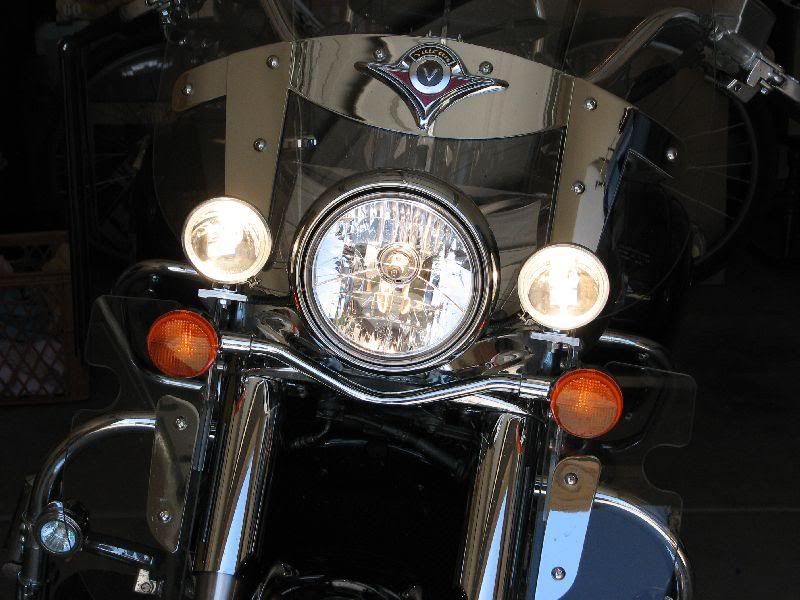 Let there be light! 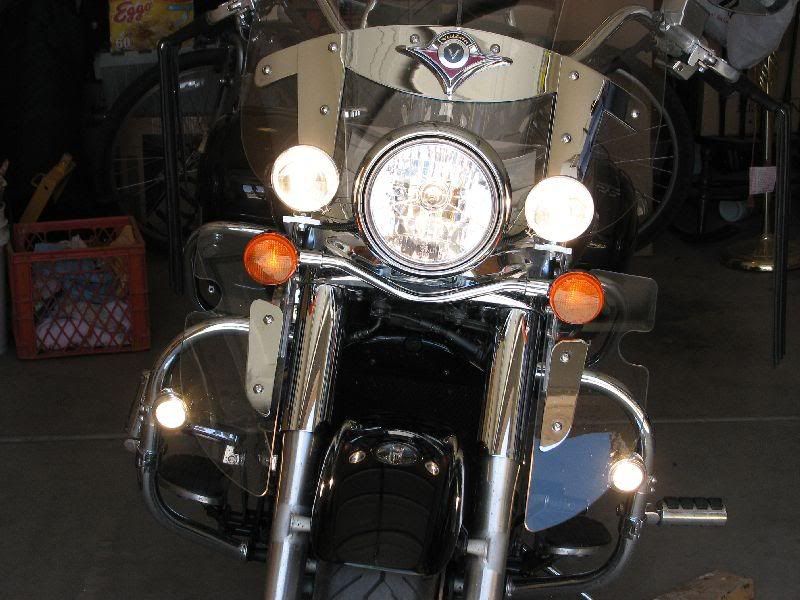 Last one... 
__________________
Scott "Cactusjack" Hanks VBA #00105 H.O.G. #4250060 2011 H-D Ultra Limited 103ci  :: 2011 HD Electra Glide Ultra Limited w/Stage 1 :: Rallies: Mesquite '08|Custer '09|Cortez '10|Crescent City '11|Kanab '12|Antlers '12|Estes Park '13|Antlers '13|Orofino '14|The Dalles '17 Login or Register to Remove Ads |

|
|
03-29-2008, 05:14 PM
|
#2 |

Join Date: Dec 2007
Location: Haysville, KS
Posts: 6,259
|
First peek at my latest work-in-progress
Very sweet looking set up. Would you want to fly to Florida to hook up a fuse box and lights for me?
__________________
Ron "Coach" Allan, Haysville, KS 1999 Nomad Wine and Red "KawaTanker" 2009 BMW R1200RT 2003 BMW K1200LT "Magic Carpet" DOA 11/7/2015 VBA #00291 IBA # 41995 DS #320 '08 Elkins, WV; '09 Helen, GA; '09 Custer, SD; '10 Stanton, VA; '11 Maggie Valley; '12 Townsend, TN; '13 Estes Park; '13 Blairsville, GA; '15 Eureka Springs; '16 Helen; '18 Custer, SD 
|
|
|
|
03-30-2008, 11:54 AM
|
#8 |
|
Guest
Posts: n/a
|
First peek at my latest work-in-progress
"Can you seeeeeeee the real meeeeeeeee........?"

|
|
|
|
03-30-2008, 06:43 PM
|
#9 |
|
Mega-Contributor
Join Date: Sep 2007
Location: Where it doesn't snow...ever!
Posts: 21,926
|
First peek at my latest work-in-progress
Thanks for the kind words. No, I don't plan on mass-producing these. They are exremely labor intensive, since I don't exactly have a machine shop in my garage. I cut them to a rough shape with a sawzall and/or jigsaw, then sand them down with sanding drums mounted in my drill press. I finish them off with 2000 grit sandpaper.
I wired the switch in today, so I can control either set of of lights independently. I doubt I would ever have both sets on at the same time, unless I was on some dark back road somewhere. Total cost was maybe $15 for 2' of 3"x3"x.25" T6061 aluminum angle. maybe another $5 for sandpaper and supplies. Plus several hours of labor on each bracket. I think I can make the new ones a little quicker, these were slow because of the trial and error factor.
__________________
Scott "Cactusjack" Hanks VBA #00105 H.O.G. #4250060 2011 H-D Ultra Limited 103ci :: 2011 HD Electra Glide Ultra Limited w/Stage 1 :: Rallies: Mesquite '08|Custer '09|Cortez '10|Crescent City '11|Kanab '12|Antlers '12|Estes Park '13|Antlers '13|Orofino '14|The Dalles '17 |
|
|
|
03-30-2008, 06:55 PM
|
#10 |
|
Guest
Posts: n/a
|
First peek at my latest work-in-progress
When you get them finalized, clear-coat them so the aluminum doesn't corrode. Otherwise you'll be polishing them all the time as they turn grey. Raw aluminum corrodes fast.
|
|
|
|
03-30-2008, 07:03 PM
|
#11 | |
|
Join Date: Dec 2007
Location: Denver, CO
Posts: 0
|
First peek at my latest work-in-progress
Quote:
I'm going to be building an aluminum rack and if spraying clear on it will stop the endless polishing, I'm on it. Just don't want to do something that starts to flake off and then have a lot more work trying to get it off. |
|
|
|
|
03-30-2008, 07:26 PM
|
#12 |
|
Guest
Posts: n/a
|
First peek at my latest work-in-progress
I have done it.
After sanding and buffing, clean well with MEK or carb spray, using clean rags, and repeat this until the aluminum is really clean. Let it dry a while under a heat lamp or in the hot sun, as aluminum is porous and will seem dry before it really is. Give it at least two light coats with a good quality high gloss poly paint. Let it cure well before trying to polish/wax it. If you do this & keep some wax on it, it should last for years. All the raw aluminum on motorcycles is clear-coated or painted from the factory. Otherwise it'd corrode right in the showroom. I was an applications engineer for an aluminum plant that did extrusions, painting and anodizing, for 6 years. We actually solvent washed the raw aluminum in big tanks, dipped it in a caustic etching tank, rinsed in water, and then we boiled it in water for 15 minutes to seal up the pores. (The pores contain aluminum oxide, which swells up when boiled, sealing the surface pores.) Then another solvent dip, a water dip, and finally into the anodizing tank. |
|
|
|
04-02-2008, 07:52 PM
|
#14 | |
|
Sr. Member
Join Date: Sep 2007
Location: Jackson, Michigan
Posts: 1,367
|
First peek at my latest work-in-progress
Scott,
I know whe spoke about these brackets before, but now I see the big picture. Those look awsome my friend. Great idea! Now you will have to put your skill to work in production, as I know you will have orders for these bad boys....  Quote:
__________________
Joe (Chuckster) Norris Jackson, Michigan 2007 Goldwing 2010 Voyager (Blue/Silver)sold 2001 Nomad (gone, but not forgotten) www.chucksterscustoms.com |
|
|
|
 |
| Thread Tools | Search this Thread |
| Display Modes | |
|
|
 Similar Threads
|
||||
| Thread | Thread Starter | Forum | Replies | Last Post |
| A few sneak peek pictures | Jared | SouthWest Group | 17 | 05-17-2011 02:07 AM |
| Work in progress | watchman | SouthCentral Group | 7 | 04-03-2009 12:16 AM |
| Trailer progress (09-13-08) | cactusjack | Parts & Accessories | 4 | 09-14-2008 09:15 AM |
| Homemade trailer progress (08/09/08) | cactusjack | Parts & Accessories | 20 | 08-21-2008 12:29 AM |
| Work in progress | ianicky | Vulcan Nomad/Vaquero/Voyager | 24 | 04-11-2008 12:15 PM |


 Linear Mode
