|
|

|
|
|||||||


 |
|
|
Thread Tools | Search this Thread | Display Modes |
|
|
|
|
|
|
|||||||
|
|
|
Thread Tools | Search this Thread | Display Modes |
 05-07-2015, 02:26 PM
|
#1 |
|
Member
Join Date: Apr 2015
Location: Mead, Colorado
Posts: 70
|
Vaquero/Voyager Stereo Amp and Speaker Upgrade and Impressions of the Results
After getting my 2011 Vaquero a few weeks ago, I felt the factory stereo setup was pretty good. But after a few weeks it left me wanting more… More clarity, overall sound range and volume when riding in a 3/4 helmet. So I ended up purchasing an amp as well as new speakers. During high school and through college I worked as a car alarm and stereo install guy and I had kept most of my tools over the last 20 years as well as keeping a stock of other items I would use so the project was pretty simple, but it took more time than expected.
You'll see the amp and the speakers I used in the photos below. I decided to stick with the 5.25" size speakers (some people are experimenting with 6.5” speakers that requires significant modifications) and used Polk Audio (DB521) as well as a Clarion amp (XC1410). Both are marine grade items so getting wet is not an issue. Install of the speakers is pretty straight forward as they drop right into the existing speaker enclosures and done (more on tuning the enclosure later). They fit fine but you’ll need to change the connectors on the wires to tighten them up some so they don’t fall off while cruising down the road. Link to the Clarion XC1410 http://www.amazon.com/gp/product/B00...?ie=UTF8&psc=1 Link to the Polk Audio DB521 http://www.amazon.com/gp/product/B00...?ie=UTF8&psc=1 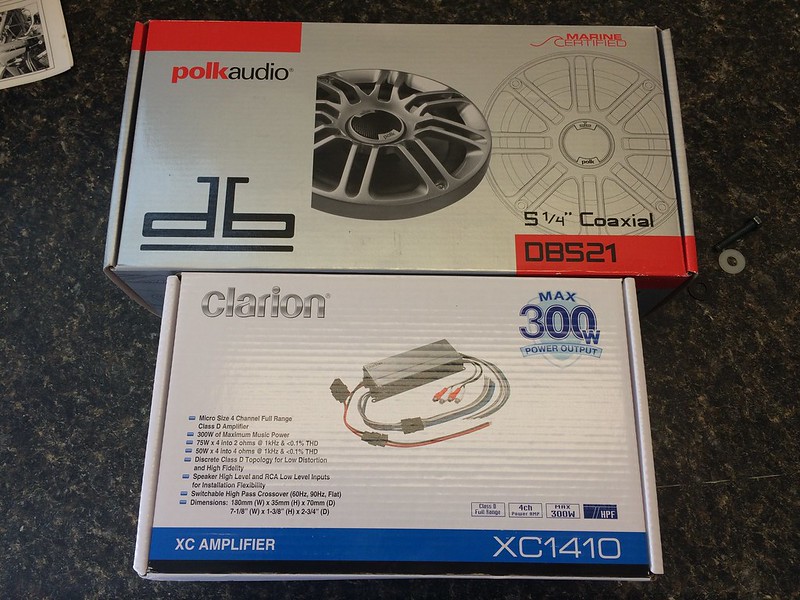 IMG_2243 by Jason Holland, on Flickr<script async src="//widgets.flickr.com/embedr/embedr.js" charset="utf-8"></script> IMG_2243 by Jason Holland, on Flickr<script async src="//widgets.flickr.com/embedr/embedr.js" charset="utf-8"></script>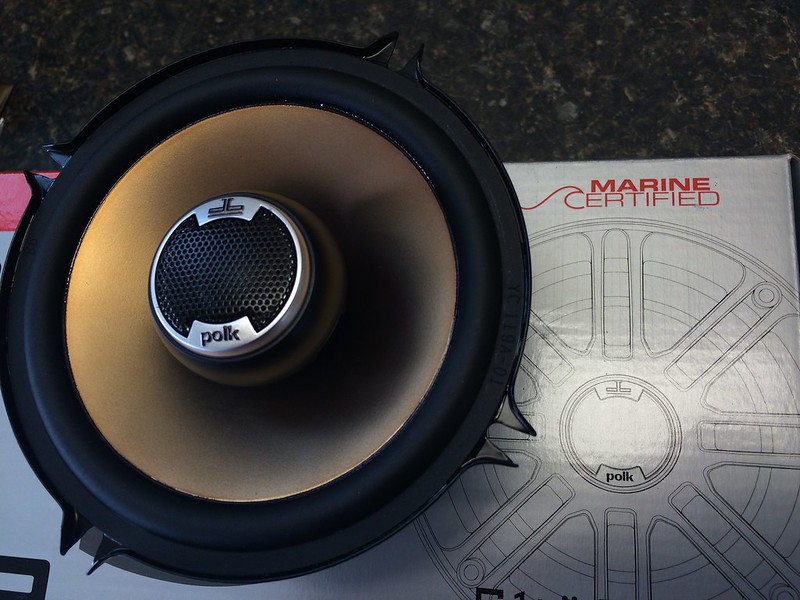 IMG_2244 by Jason Holland, on Flickr<script async src="//widgets.flickr.com/embedr/embedr.js" charset="utf-8"></script> IMG_2244 by Jason Holland, on Flickr<script async src="//widgets.flickr.com/embedr/embedr.js" charset="utf-8"></script>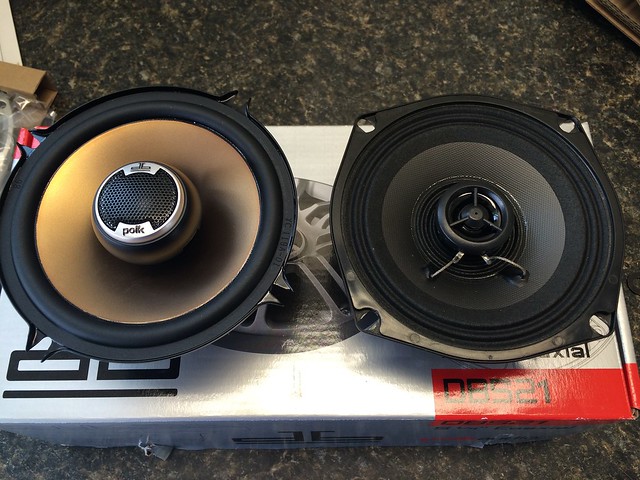 IMG_2245 by Jason Holland, on Flickr<script async src="//widgets.flickr.com/embedr/embedr.js" charset="utf-8"></script> IMG_2245 by Jason Holland, on Flickr<script async src="//widgets.flickr.com/embedr/embedr.js" charset="utf-8"></script>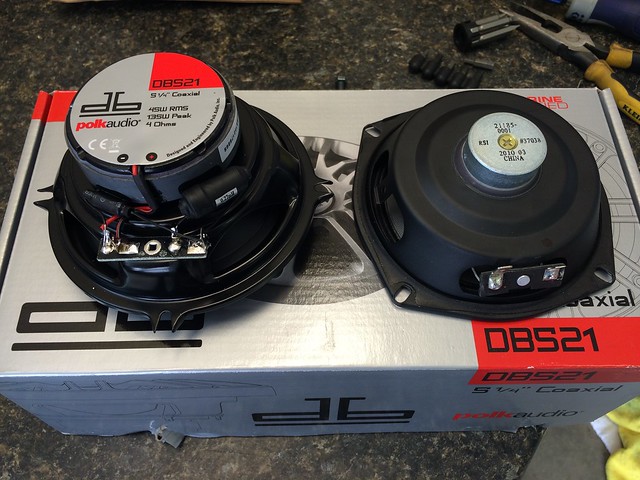 IMG_2247 by Jason Holland, on Flickr<script async src="//widgets.flickr.com/embedr/embedr.js" charset="utf-8"></script> IMG_2247 by Jason Holland, on Flickr<script async src="//widgets.flickr.com/embedr/embedr.js" charset="utf-8"></script>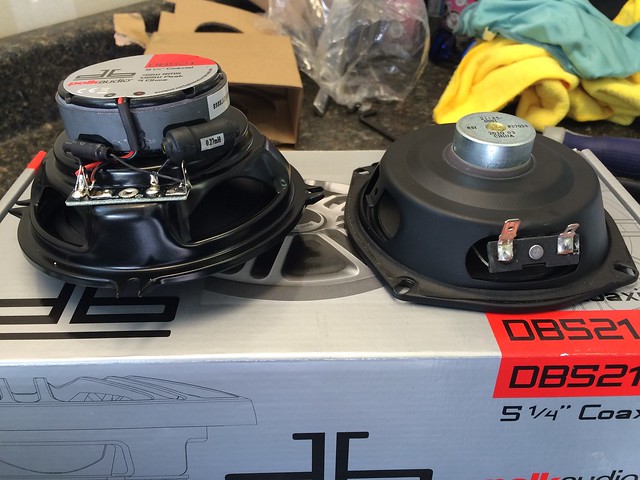 IMG_2248 by Jason Holland, on Flickr<script async src="//widgets.flickr.com/embedr/embedr.js" charset="utf-8"></script> IMG_2248 by Jason Holland, on Flickr<script async src="//widgets.flickr.com/embedr/embedr.js" charset="utf-8"></script>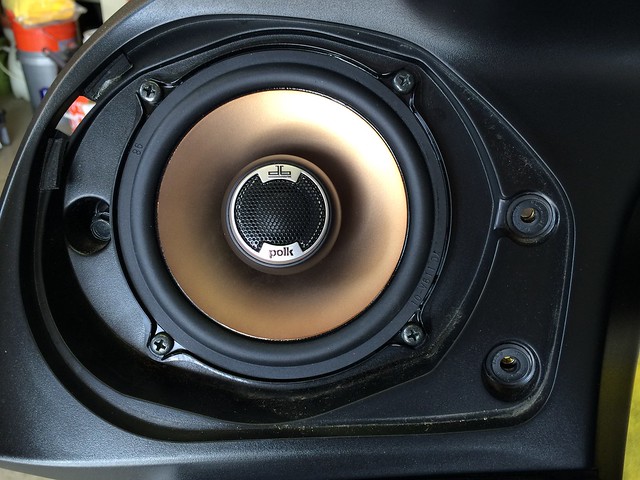 IMG_2251 by Jason Holland, on Flickr<script async src="//widgets.flickr.com/embedr/embedr.js" charset="utf-8"></script> IMG_2251 by Jason Holland, on Flickr<script async src="//widgets.flickr.com/embedr/embedr.js" charset="utf-8"></script> IMG_2252 by Jason Holland, on Flickr<script async src="//widgets.flickr.com/embedr/embedr.js" charset="utf-8"></script> IMG_2252 by Jason Holland, on Flickr<script async src="//widgets.flickr.com/embedr/embedr.js" charset="utf-8"></script>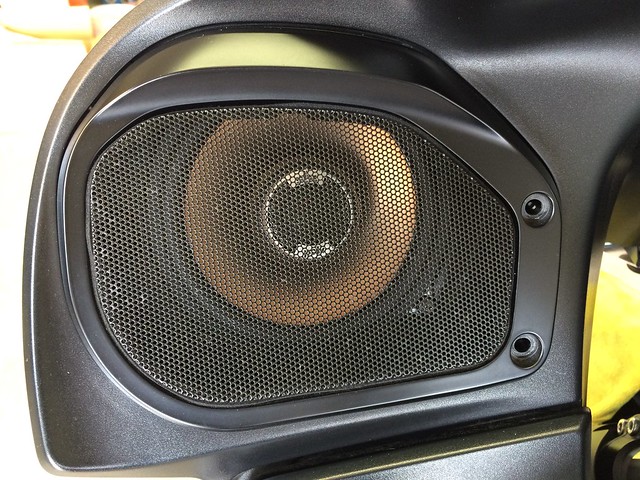 IMG_2254 by Jason Holland, on Flickr<script async src="//widgets.flickr.com/embedr/embedr.js" charset="utf-8"></script> IMG_2254 by Jason Holland, on Flickr<script async src="//widgets.flickr.com/embedr/embedr.js" charset="utf-8"></script>The amp is a different story as the fairing has to come off. This is my second time taking it off and it's much quicker the second time around. The first time was for the aux light install. You also have to run power back to the batter and ground back to just behind the tank area on the frame where the chassis ground its. This takes jacking up the back of the tank and sticking your arm up to get the wires and pulling them through the wire supports along the frame. This in itself is not difficult, just complicates the process. You also need to install a waterproof fuse holder of at least 20 amp at the battery and at least 12 gauge wire for the power/ground install. The wire I used was a paired power and ground together. This can be hard to find so to keep it simple you can also use speaker 12 gauge speaker wires that come paired which should be available at Home Depot, Lowe’s and others. There is a fuse holder inline at the amp, but for proper safety, you need one at the battery incase the wire shorts somewhere along the frame over time. If there’s no fuse at the battery, then you have a direct connection between the positive terminal and ground which may cause a fire or damage the battery. I chose to use the following fuse holder: http://www.amazon.com/gp/product/B00...?ie=UTF8&psc=1
__________________
If driving a car is like watching a movie... Then riding a motorcycle is like staring in a movie... And riding a motorcycle with a stereo is like staring in a movie with a great soundtrack!!! Login or Register to Remove Ads |

|
|
05-07-2015, 02:27 PM
|
#2 |
|
Member
Join Date: Apr 2015
Location: Mead, Colorado
Posts: 70
|
The amp has to be properly mounted so it's secure, noting damages electronics like vibration and nothing annoys me like rattles! I got lucky and the screw flanges for my amp matched up perfect with the frame that supports the radio. I just drilled two holes through the tubular frame and then used 4mm bolts to secure it all the way through the frame with nylon lock nuts and washers. The metal of the frame is very thin and kinda soft so the drill buzzed right though without any issues. To make sure it didn't rattle I used 3/8" rubber weather seal on the bottom and back of the amp on anywhere that would touch anything. Several other installs I’ve seen in the Vaquero required a makeshift mounting bracket to get their amps secured so this is a little more simple. When I found the Clarion online it looked to be a little smaller than what others were using and I figured I could work something like this out with it. I was very happy with the strength of the mounting after it was in. Sorry, no photos of the battery attachment, the wire is run down the left side of the frame and into the battery compartment with the factory harness, the fuse holder is stuck down with the ECM.
 IMG_2237 by Jason Holland, on Flickr<script async src="//widgets.flickr.com/embedr/embedr.js" charset="utf-8"></script> IMG_2237 by Jason Holland, on Flickr<script async src="//widgets.flickr.com/embedr/embedr.js" charset="utf-8"></script>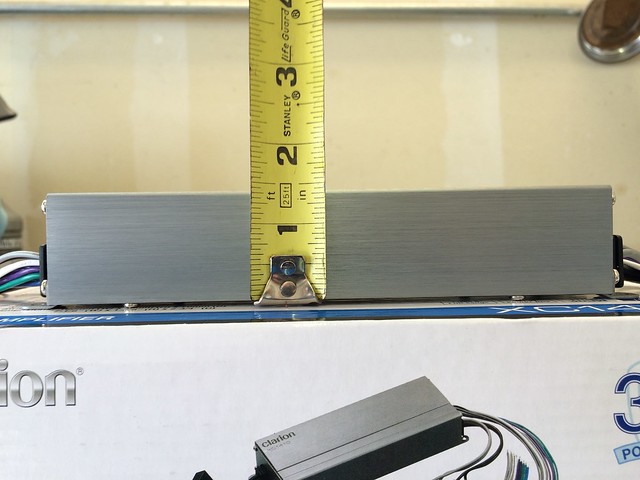 IMG_2257 by Jason Holland, on Flickr<script async src="//widgets.flickr.com/embedr/embedr.js" charset="utf-8"></script> IMG_2257 by Jason Holland, on Flickr<script async src="//widgets.flickr.com/embedr/embedr.js" charset="utf-8"></script>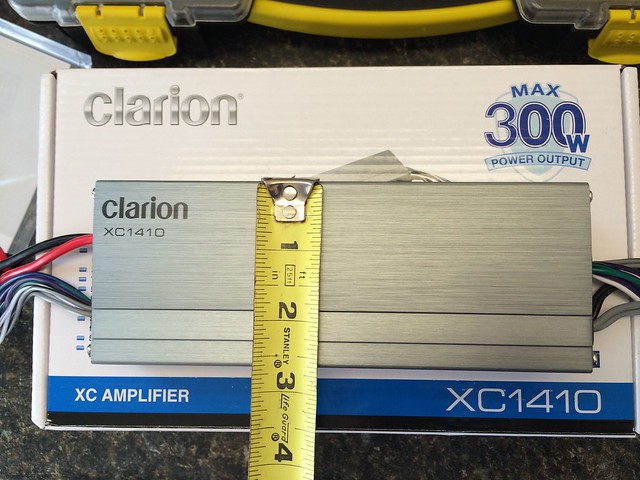 IMG_2256 by Jason Holland, on Flickr<script async src="//widgets.flickr.com/embedr/embedr.js" charset="utf-8"></script> IMG_2256 by Jason Holland, on Flickr<script async src="//widgets.flickr.com/embedr/embedr.js" charset="utf-8"></script>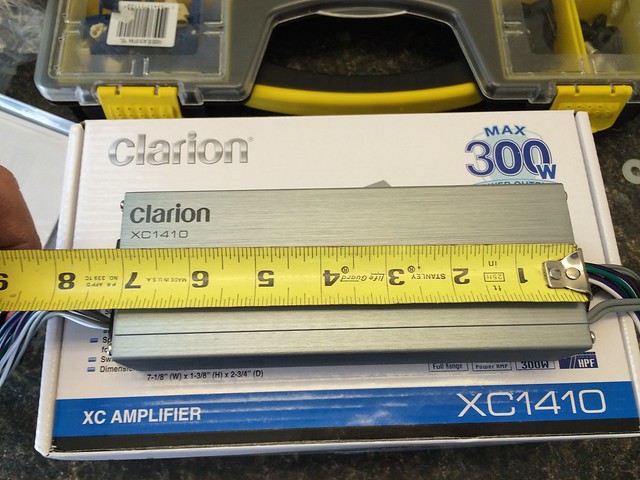 IMG_2255 by Jason Holland, on Flickr<script async src="//widgets.flickr.com/embedr/embedr.js" charset="utf-8"></script> IMG_2255 by Jason Holland, on Flickr<script async src="//widgets.flickr.com/embedr/embedr.js" charset="utf-8"></script>Below you can see it in the mounted location, notice the foam strips behind and under it. The foam is compressed under the pressure of the screws to assure that it’s solid in it’s position. Only the two 4mm bolts are needed to make it totally rock solid the way I have it positioned. I used stainless hardware and stuck with the metric sizing so I didn’t throw off the mojo of the metric bike. 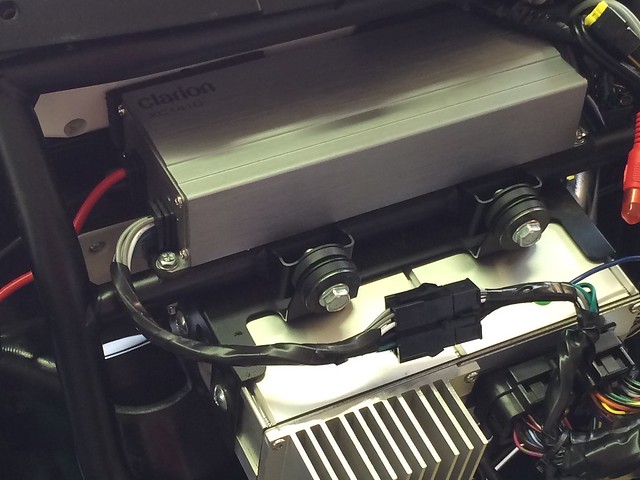 IMG_2265 by Jason Holland, on Flickr<script async src="//widgets.flickr.com/embedr/embedr.js" charset="utf-8"></script> IMG_2265 by Jason Holland, on Flickr<script async src="//widgets.flickr.com/embedr/embedr.js" charset="utf-8"></script>This is the foam strip available at Lowe’s, Home Depot, ACE and all the other places. 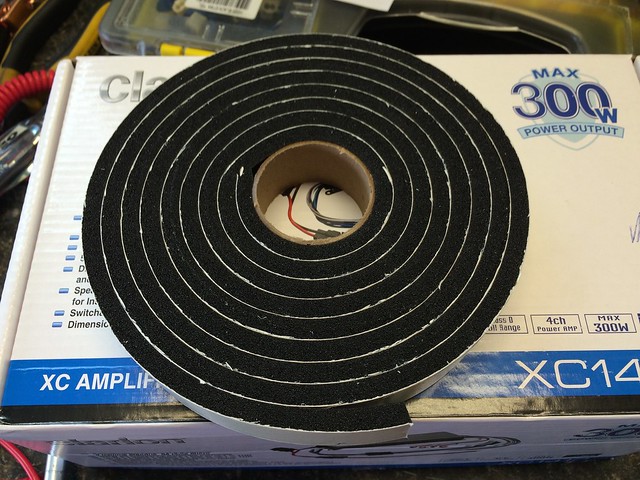 IMG_2266 by Jason Holland, on Flickr<script async src="//widgets.flickr.com/embedr/embedr.js" charset="utf-8"></script> IMG_2266 by Jason Holland, on Flickr<script async src="//widgets.flickr.com/embedr/embedr.js" charset="utf-8"></script>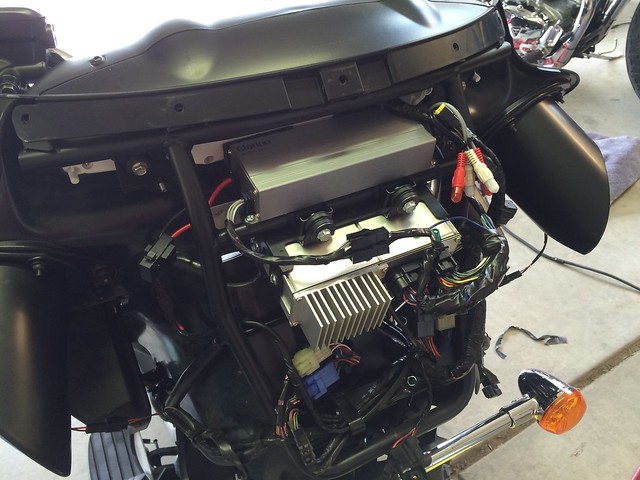 IMG_2265 by Jason Holland, on Flickr<script async src="//widgets.flickr.com/embedr/embedr.js" charset="utf-8"></script> IMG_2265 by Jason Holland, on Flickr<script async src="//widgets.flickr.com/embedr/embedr.js" charset="utf-8"></script>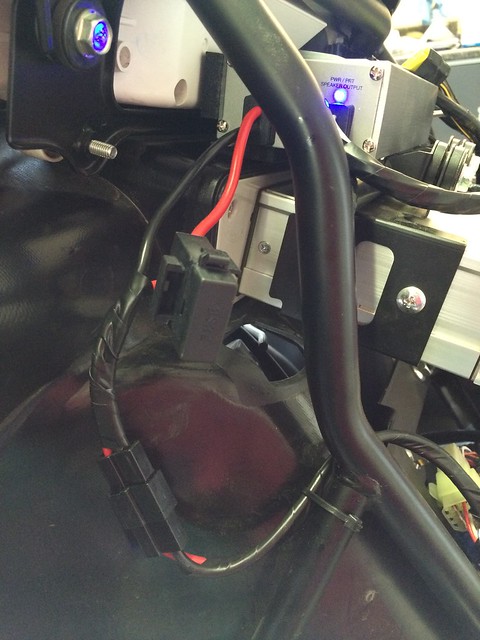 IMG_2262 by Jason Holland, on Flickr<script async src="//widgets.flickr.com/embedr/embedr.js" charset="utf-8"></script> IMG_2262 by Jason Holland, on Flickr<script async src="//widgets.flickr.com/embedr/embedr.js" charset="utf-8"></script>After that it was time to wire up the speakers. Since there is not RCA outputs on the head units, you need to use the speaker output from the head unit and cut them. The side going into the head unit becomes the input into the amp and the side going to the speaker is the output from the amp. This get spliced into the amps wires per the instructions. Other than that you have to find the keyed line that turns the head unit on and tie into that so the amp comes on with the key as well. What you see below is the wire colors for the two front speakers. If you’re working on a Voyager, you should be able to locate the rear colors at the back connections and then relocate them at the head unit to splice into. The pair on the right is the RIGHT speaker and the pair on the left is the LEFT speaker. The keyed power line (not shown) is blue from the bike harness as well as on most amps. 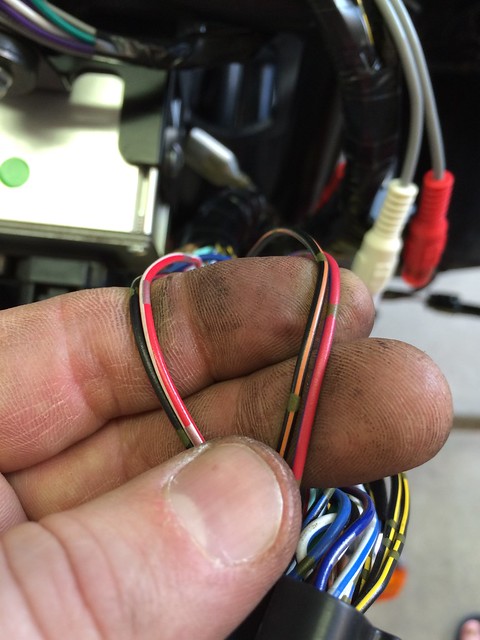 IMG_2260 by Jason Holland, on Flickr<script async src="//widgets.flickr.com/embedr/embedr.js" charset="utf-8"></script> IMG_2260 by Jason Holland, on Flickr<script async src="//widgets.flickr.com/embedr/embedr.js" charset="utf-8"></script>
__________________
If driving a car is like watching a movie... Then riding a motorcycle is like staring in a movie... And riding a motorcycle with a stereo is like staring in a movie with a great soundtrack!!! |
|
|
|
05-07-2015, 02:27 PM
|
#3 |
|
Member
Join Date: Apr 2015
Location: Mead, Colorado
Posts: 70
|
Some people prefer to solder and some like crimps. I worked my way thought college doing car stereo and alarm installs. It's my belief that it's much easier to screw up a solder joint than a crimp. This was also the belief of the shop owner, who I trusted without question, so I always crimped everything and then if there is any concern for water intrusion, you can also use heat shrink which I did over all the barrel crimps as you'll see in the photos. Everything is then taped and zip tied securely.
You can see everything spliced together here. Test before you heat up your heat shrink incase you need to make changes. 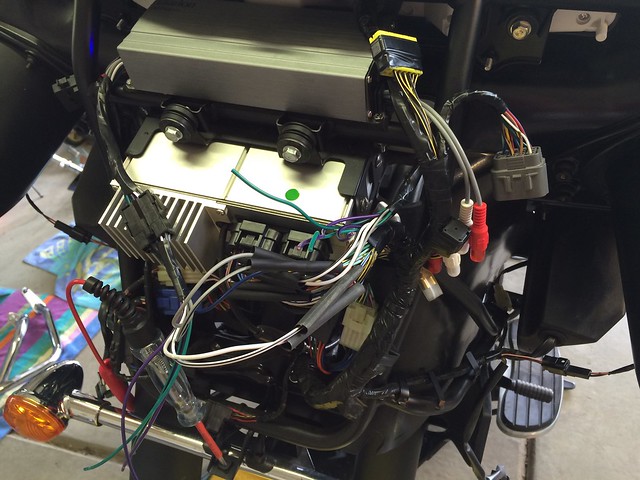 IMG_2261 by Jason Holland, on Flickr<script async src="//widgets.flickr.com/embedr/embedr.js" charset="utf-8"></script> IMG_2261 by Jason Holland, on Flickr<script async src="//widgets.flickr.com/embedr/embedr.js" charset="utf-8"></script>Finished product after taping and zip-ties so nothing is loose.  IMG_2264 by Jason Holland, on Flickr<script async src="//widgets.flickr.com/embedr/embedr.js" charset="utf-8"></script> IMG_2264 by Jason Holland, on Flickr<script async src="//widgets.flickr.com/embedr/embedr.js" charset="utf-8"></script>Initially I had not shot any photos of the batter connection. Below you can see two shots of how that connection is wired now. You can pull the fuse holder up and out to access the fuse and then tuck it back down into the box and put the lid back on. For those batter connection I choose to pull off the nylon insulator that comes on the ring crimp and then crimp the bare metal ring to the wire, using the heat shrink to clean it up and protect the crimp. If you look close you can see that's what I've done with both the amp connection as well as the BatterTender connection. The amp is grounded to the frame right in front of the factor fuse holders (not pictured), to the preexisting factory ground terminal. 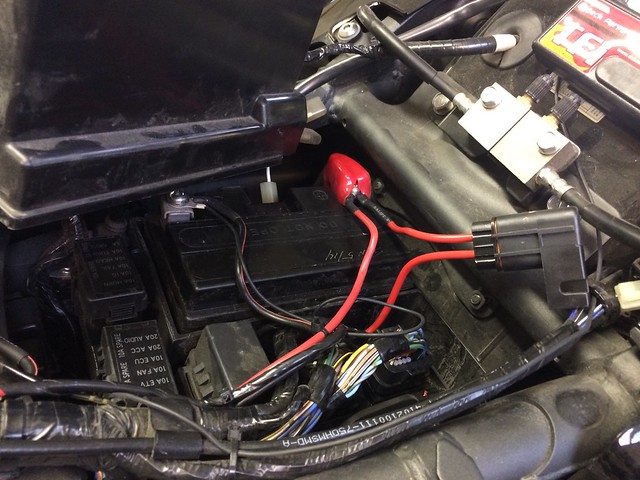 IMG_2283 by Jason Holland, on Flickr IMG_2283 by Jason Holland, on Flickr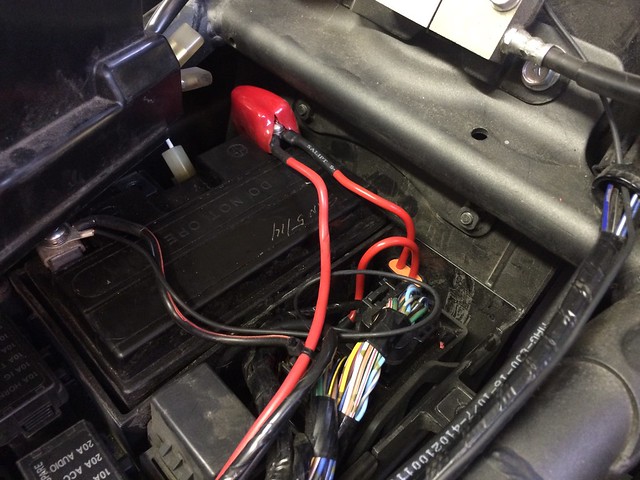 IMG_2284 by Jason Holland, on Flickr IMG_2284 by Jason Holland, on FlickrI played with the speakers mounted into the factory speaker enclosures and also with them removed. The sound to me with them removed was too loose, it sounded like the speakers where flapping too hard at high volume. With them in the enclosures, the base was much tighter but it also kind of amplified the midrange more than I would like. Upon closer inspection it appears that the holes that the wires go though are actually acoustical tuned ports for the factory speakers. When dealing with tuned enclosures they are specific to pretty much just one speaker. I decided to see what happened if I drilled an additional hole in the enclosure. This created the same loose base sound that was there without the enclosures so I taped the hole that I drilled and then located an old pillow. The pillow stuffing can be used to “stuff” a speaker enclosure to help with a overall base response at times. With these being very small speakers, this concept doesn’t work as well as it does for large woofers, but it will tighten up the base some and likely help you be able to drive them to a higher volume without distortion. This is exactly what happened when I stuffed the enclosure about 3/4 the way full and replaced the speaker into the enclosure. After this the sound quality was still not to my liking and I was not able to correct this with the bass and treble controls on the head unit. Then it dawned on me that I’d not worked with the EQ in the iPod yet. I’m using an iPod Touch that belonged to my daughter and has a broken screen. There’s no issue with a broken screen since we’re just locking them up in the glove box so if you don’t have an iPod consider buying one from eBay with a broken screen to save money. After messing with the iPod EQ and then fine tuning with head unit bass and treble, things fell into place. Overall the sound clarity, total volume and range of frequency is all about 25% better than it was with the stock speakers and no amp. As you can see there's no comparison between the stock speaker and these in the photos. After riding with the new setup, I was even more impressed. The sound quality at high volumes was much better and very clear through my 3/4 helmet and the wind noise. There are things on some songs that I didn't pick up with the factory setup. Listening to the iPod, you could really tell the difference in the different bitrates of the MP3 files, whereas you couldn't tell with the factory speakers. The tweeters are direction adjustable which makes a big difference in where the sweet spot is for the highs. They have about 1/4" clearance on the inside of the grills. For those thinking of forgoing the amp, I had initially hooked up the speakers with just the factory head unit just to play around with it. I did notice that the head units heatsink got hot quick, I would assume this was a result of the large voice coils in these speakers. But with the amp installed, there was no pretty much no heat coming off the amp. There was not much of an improvement in sound or volume without the amp installed so I would avoid upgrading just the speakers. If you don't mind playing around with electrical stuff and have the time to burn, this is a decent upgrade. But if you’re timid to work with electrical items on your bike, this may not be for you. Overall it was worth my time and I’m pretty happy with it after all the fine tuning was done. It’s never going to sound like a nice car stereo since you’re not listening in an enclosed space but for about $150 it’s a good investment.
__________________
If driving a car is like watching a movie... Then riding a motorcycle is like staring in a movie... And riding a motorcycle with a stereo is like staring in a movie with a great soundtrack!!!
Last edited by Fried Chicken Blowout; 05-10-2015 at 10:09 AM.
|
|
|
|
05-07-2015, 03:56 PM
|
#6 |
|
Member
Join Date: Apr 2015
Location: Mead, Colorado
Posts: 70
|
Thanks!
I did forget one thing. If you're new to this kinda stuff and are wondering what you need here's the basic list besides your standard hand tools to get the bike apart. Kline Crimp Cutters - I prefer the standard ones, the "upgraded" ones are too stiff for me. At least the set I bought. I strip the wire which these too, but some people have a hard time with that and end up cutting the wire in the process. Assorted crimp connectors - Mostly red barrel crimps, a few red spade connectors for the speakers, correct size ring connectors for the ground and power as well as two larger barrels for the power connections to the amp's wires. Zip ties - I'm a freak about using black zip ties, don't let me catch you using white. Electrical tape - Spend a couple bucks on a roll, it's actually much better than the cheap stuff. One old pillow - I won't tell your wife if you won't... 12v test light - These are just awesome to have. I only used it for the keyed remote turn on wire identification. Heat Shrink - A kit like this would go a long way. I used a heat gun, like a blow dryer on steroids, you might be able to use a blow dryer. If not then you can use a match or a candle or a torch if you just kinda get it close and don't bunt anything. They react quickly and will melt in direct flame. 10 or 12 gauge power/ground wires - I had a bunch in my supply and I think it was 12 gauge and was paired (power and ground bonded together like speaker wire is). I would stick with paired wire like this, it's just easer to deal with. The distance is very short back to the battery otherwise I would suggest 10 gauge. You can get speaker wire at the hardware store that will work for this, just make sure you don't screw up which one is positive and negative. I then just wrap it all the way down in electrical tape to make it all black and to add an additional layer of protection and then run it where I need it. Waterproof Fuse Holder - I picked this one on Amazon, seems much nicer than what I used years ago. You can also find them that would match the fuses that come on the bike. The bike uses what I think are called "Mini Fuse" and this one holds and ATO fuse which is considered the "Regular" fuse. ATO Fuses - You don't need this much for sure so you might just pick up one or two at the automotive store. I looked at Lowe's the other day and they were very expensive for what you got. One other hot tip, the battery connector screw is a 6mm screw that is too short to grab the nut if you have more than one ring connection under the head of the screw. Get one that's a tad longer from the hardware store and use that so you don't have to fight with the nut when reconnecting. The stuff I didn't give links to you can get from the hardware store for fair prices. The stuff I gave links to are MUCH cheaper on Amazon if you have the Prime service for free shipping. And as always, disconnect the NEGATIVE terminal first before doing any electrical work on automotive or motorcycles. That's all I think I used for the project. Let me know if you have any questions.
__________________
If driving a car is like watching a movie... Then riding a motorcycle is like staring in a movie... And riding a motorcycle with a stereo is like staring in a movie with a great soundtrack!!!
Last edited by Fried Chicken Blowout; 05-07-2015 at 04:00 PM.
|
|
|
|
05-07-2015, 05:04 PM
|
#8 | |
|
Member
Join Date: Apr 2015
Location: Mead, Colorado
Posts: 70
|
Quote:
__________________
If driving a car is like watching a movie... Then riding a motorcycle is like staring in a movie... And riding a motorcycle with a stereo is like staring in a movie with a great soundtrack!!! |
|
|
|
|
05-07-2015, 07:05 PM
|
#9 |
|
Member
Join Date: Nov 2014
Location: Luverne MN.
Posts: 97
|
Nice job on both the install and the write up. I've been planning on upgrading a unit as well but always seem to have something more pressing and just never seem to mess with stereo stuff... Anyhow... I have a question, if I used this 4 channel amp on a Vaquero with two speakers do you simply not hook up the other channels for the rear speakers or would it be better to get a two channel amp?
|
|
|
|
05-07-2015, 07:10 PM
|
#10 |
|
Member
Join Date: Nov 2014
Location: Luverne MN.
Posts: 97
|
Thought I'd add a tip for the too short battery bolts as well. We use a little tiny piece of battery vent hose (or similar hose) lift the nut off the floor of the battery tower with the battery bolt and stick the piece of hose under the nut with a needle nose and it will be held up to the top of the tower and you can still use the factory bolt.
|
|
|
|
05-07-2015, 07:44 PM
|
#11 | |
|
Member
Join Date: Apr 2015
Location: Mead, Colorado
Posts: 70
|
Quote:
Some 4 channel amps are designed to "bridge" and double the power when working as a 2 channel amp. But I couldn't find any reference to this amp being capable of bridging. At some point I may attempt to add rear speak and would then use the rear channel. From what I've heard so far riding around I don't think any additional power would benefit these speakers. The amp I got is a 50w continuous x 4 channel at 4 ohm. The speakers are rated for continuous 45w and are 4 ohm. So it's basically at the max power for these speaker. And yes, I did not hook up the rear when I did the install. You just need to protect them so they can't short against each other or ground. So yes if you're only ever going to run 2 speakers then a 2 channel amp is all you need. You need to make sure you get one with speaker level inputs and not just RCA hookups. Most of these little amps are for running 4 car speakers so they like to make them 4 channels.
__________________
If driving a car is like watching a movie... Then riding a motorcycle is like staring in a movie... And riding a motorcycle with a stereo is like staring in a movie with a great soundtrack!!! |
|
|
|
|
05-10-2015, 10:11 AM
|
#13 |
|
Member
Join Date: Apr 2015
Location: Mead, Colorado
Posts: 70
|
The post has just been updated to show the batter connections and the fuse holder install.
__________________
If driving a car is like watching a movie... Then riding a motorcycle is like staring in a movie... And riding a motorcycle with a stereo is like staring in a movie with a great soundtrack!!! |
|
|
|
05-17-2015, 02:03 PM
|
#15 |
|
Member

Join Date: Dec 2013
Location: New Castle, In.
Posts: 365
|
Frierd Chicken Blowout, a question on the encloser. I believe you stuffed it some to increase low end clarity? Since I'm using larger speaker, Pioneer TS-A1675R, my factory enclosure will not fit them. Would you think these would be effective in creating a better responce, tighten up the bass some. http://www.crutchfield.com/p_237XT65...h.html?tp=2809
They also come in 2 3/8" amd 3" depths. I know I'll never get a thumping sound from these small speakers, but these are cheap, if they help any at all. Thanks for any input. I'm also using this amp. http://www.crutchfield.com/p_020XC14...10.html?tp=115
__________________
2005 800 Classic 2012 Voyager ABS |
|
|


 Linear Mode
