|
|
 10-11-2014, 01:51 PM
|
#61 | |
|
Sr. Member

Join Date: Sep 2011
Location: SOUTH FLORIDA
Posts: 1,210
|
Quote:
RACNRAY
__________________
"TRUE HAPPINESS IS IN THE HEART, NOT IN THE OUTSIDE FIXES" WITH OVER 46 YEARS AS A MOTORCYCLE TECHNICIAN/HI-PO SHOP OWNER I AM A PURVEYOR OF FACT NOT FICTION! "WE LIVE OUR LIVES IN CHAINS NEVER KNOWING WE HAD THE KEY" Login or Register to Remove Ads |
|

|
|
10-11-2014, 10:15 PM
|
#62 | |
|
Member

Join Date: Nov 2013
Location: Osage county Oklahoma
Posts: 248
|
Quote:
You might not be happy with the power pro mated to the FP duels. Thunderous decel pop. I've switched to the PCV with autotune and pretty much tamed the pop. Also make sure the crossover is completely pushed together before clamping or you could have the slots in the inner pipe exposed. |
|
|
|
|
10-12-2014, 06:23 PM
|
#63 |
|
Advanced Member
Join Date: Dec 2011
Location: Rockland,ont
Posts: 519
|
Jase64
The sound is a deeper tone that the v&H 2 into 1,, my buddy Mike had them on and switch to the FP and is much happier
__________________
Lukster National CVFR SAA Rockland,Ont Nomad 2010 Voyager trunk Alleycat intake / YVANIZE ECU, Freedom performance 2 into 1  Kuryaken grip with Throttle mod lost of chrome add on Sound digital 1200.4 2 ohm 6 x 9 MPX 690 Hertz in custom fairing 6.5 hcx hertz speakers in hard bags 6.5 MPX hertz in pods |
|
|
|
10-13-2014, 04:58 AM
|
#64 |
|
Jr. Member

Join Date: Aug 2014
Location: South Florida
Posts: 45
|
Installed the Fi2000 PowrPro yesterday. About a half hour or so to do that. FP pipes should come in today (as per UPS tracking info). I took the bike out for a test ride on some back roads. Went for about a ten mile ride. Although I still did have some backfiring on decel, and although I can still hear it through the stock pipes, it was however much more reduced since installing the PwrPro. Also noticed that when I twist it open, and quickly ease off throttle, there is was virtually no backfire either. Something I was getting prior to install. Happy thus far. Will post further results once pipes are installed. But that propably wont be till later on in week, since I have to wait for header gaskets I ordered and they wont be in til at least Wed./Thur.
|
|
|
|
10-13-2014, 05:19 AM
|
#65 |
|
Jr. Member
Join Date: Aug 2014
Location: South Florida
Posts: 45
|
Another question, now on air intakes. I've noticed that the air filter is on the left side of engine. So when I order an air kit, it will be to replace the left side cover. How about the right side cover? Do these air kits come with two covers, or I have to order a separate cover for right side?
Login or Register to Remove Ads |
|
|
|
10-13-2014, 06:59 AM
|
#66 |
|
Advanced Member
Join Date: Dec 2011
Location: Rockland,ont
Posts: 519
|
C3po
The air intake goes on the right side,,, you remove the left side air box entirely and connecting plastic cross over tube that connects to the right side. Then you remove the original right side air box... plug the 11 o'clock black hose ( don't forget) from a plug provided in the kit you will get. Then simply follow the instruction provided in your kit to mount the air box... What I would do since You will have apart is order the thunder throttle body gasket and install prevents any air leak you might have as the point... some 1700 are prone to have air intake leaks and the gasket takes care of that. http://www.thundermfg.com/store/inde...t_detail&p=472
__________________
Lukster National CVFR SAA Rockland,Ont Nomad 2010 Voyager trunk Alleycat intake / YVANIZE ECU, Freedom performance 2 into 1 Kuryaken grip with Throttle mod lost of chrome add on Sound digital 1200.4 2 ohm 6 x 9 MPX 690 Hertz in custom fairing 6.5 hcx hertz speakers in hard bags 6.5 MPX hertz in pods |
|
|
|
10-13-2014, 07:45 PM
|
#67 |
|
Jr. Member
Join Date: Aug 2014
Location: South Florida
Posts: 45
|
Finally heeeeeere!
Well my FPs finally arrived today! Even though I still dont have the header gaskets, I nonetheless began pulling off the stock exhaust. Once that was done I opened the box the FPs shipped in. WOW! What a beautiful set of pipes!! All black! Like I originally wanted. On the Amazon site the ones pictured were all black with chrome tips.I t even described them as such. But I jumped on them anyway, in fear that as I read here once, there had been a shortage of the black sets. I was very very surprised and needless to say pleased that this set was all black including the black tips! (dont know how to post pics) but they look kick @$$!!! Bought header wrap at my local auto part store and will start to wrap the pipes before I begin install.
|
|
|
|
10-15-2014, 01:26 PM
|
#69 | |
|
Sr. Member
Join Date: Sep 2011
Location: SOUTH FLORIDA
Posts: 1,210
|
Quote:
SORRY...I just had to do it, just in a mood. I always wrap the primary tubes as far as I can go, down to the collector or in the case of a dual system back to the mufflers. ARCNRAY
__________________
"TRUE HAPPINESS IS IN THE HEART, NOT IN THE OUTSIDE FIXES" WITH OVER 46 YEARS AS A MOTORCYCLE TECHNICIAN/HI-PO SHOP OWNER I AM A PURVEYOR OF FACT NOT FICTION! "WE LIVE OUR LIVES IN CHAINS NEVER KNOWING WE HAD THE KEY" |
|
|
|
|
10-16-2014, 10:11 AM
|
#70 |
|
Jr. Member
Join Date: Aug 2014
Location: South Florida
Posts: 45
|
FPs installed!
Well, I did it! Finally finished installing my new FP duals. Took me all of three days, but thats cause I would work on it a little once I got home from work and until I had to do some other errand to run. What absolutely took me the longest was wrestling with the pipe wrap! Used two 25ft. rolls of DEI exhaust wrap (purchased at my local automotive part store). On the wrap itself, I looked up info on how to do it on YouTube, most said to soak the wrap in a bucket or container filled with water. I did that with the first set of pipes, (the short ones that go from the rear jug to the right muffler). Used the first roll of wrap for that. What a watery mess. The second set of pipes I used the second roll, but instead of soaking the roll in water, and before unfurling/unrolling the roll, I simply sprayed the whole roll with the garden hose allowing the water to get soaked in. Did that on both side of the roll. Much better application and far less water mess. As far as the actual FP install...the instruction sheets (and there a whole two of them) are very ambiguous, to say the least. The illustrations are small and very poor quality, and it appears as tho the bike used in the pics was not necessarily a Vaquero. I had a difficult time acquiring a point of reference for the placement of most parts. As many whom have installed FPs commented, TAPE UP EVERY PART OF BOTH THE LOWER ENGINE AS WELL AS THE HEAT SHIELDS THAT WILL COME IN CONTACT WITH EACH OTHER. For they WILL COME IN CONTACT with each other, AND THEY DO SCRATCH VERY EASILY (Both bike and heat shields) Once all was in place, everything tightened GUT n TITE, double checked all connections, I rolled her out of the garage, and SHAZAAAAAM! Sheer sensory bliss....obvioulsy you hear the thunderous low rumble, but once I twisted the throttle just a wee bit, you can actually feel the thump... I went out for the perfunctory ride, got some decel pop, but certainly not what I was expecting from some of the FP install posts. Now just waiting for my Thunder air kit, and my 'early' Christmas will be complete. Still havent figured out how to post pics. :(
|
|
|
|
10-19-2014, 07:35 AM
|
#71 |
|
Jr. Member
Join Date: Aug 2014
Location: South Florida
Posts: 45
|
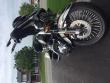
New FPs
IMG_6148.jpg
Here is my steed with the new FPs!! Now waiting on the Thunder black and billet air kit. |
|
|
|
12-07-2014, 11:10 PM
|
#73 |
|
Jr. Member
Join Date: Aug 2014
Posts: 29
|
Freedom Performance Pipes
I recently purchased a 13' Vaquero and based on the reviews I read here and other sites I went with the Freedom Performance True Duals exhaust in flat black. I got them through http://store.58cycle.com They look amazing on the bike and sound even better. The stock pipes sound like two rabbits throwing cotton balls at each other. The FP pipes have a deep throaty rumble to them, slightly mutteled, not so loud that you are pissing off every neighbor but people will definitely notice the bike coming. Alot of my Harley friends have had made great comments about the bike and like the look and sound of the FP.
The instructions are very clear and simple to follow. They even came with a picture page for quick reference. Thanks to some tips I read on this forum, the pipes only took about 1.5 hours to mount. Definitely pre-mount the heat shields with the band clamps engaged but loose with all the hex heads pointing down. The front shield has four. The second from the top I just used a long screwdriver from the front of the bike to tighten it. The top clap I also used the screwdriver. The rest are relatively easy to access and a socket is best DO NOT tighten anything until everything is assembled. You will need back/forth up/down play to get everything lined up correctly. The "P" clamp for the crossover pipe that mounts to the support bracket needs a small needle nose or standard vice grip to squeeze it shut enough to get the nut threaded on the bolt. This wont make sense until you are under the bike busting your knuckles. Have plenty of tarps, padding, blankets ect. to layout the old part (if you are trying to preserve them) and the new parts. Also a 6" or 12" ratchet extention and universal joint will make the job easier. If you are mounting passenger floor boards, do this BEFORE you mount the right rear muffler. The bolts are difficult at best to access with the pipe in place. (yes I had to pull the muffler after I had installed it) Also, be sure your cat didnt take a shit under the bike before you start working on it  No regrets. Love the Pipes. Relatively straight forward install. A few jealous friends. Life is good
Last edited by Kaneld; 12-07-2014 at 11:18 PM.
|
|
|


 Linear Mode
