|
|

|
|
|||||||


 |
|
|
Thread Tools | Search this Thread | Display Modes |
|
|
|
|
|
|
|||||||
|
|
|
Thread Tools | Search this Thread | Display Modes |
 03-28-2016, 05:26 PM
|
#1 |
|
Member
Join Date: Feb 2014
Posts: 80
|
Hello ladies and gentlemen!
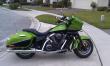
This is a product pre-launch - the rollout is taking place over the next couple of days! I know the aftermarket companies short-change us Kawasaki riders so it’s always nice when a new product comes along! I love the engineering spirit this club has! If no one else will make it – we’ll make it our own damn selves!! I have been working on a project the last few months as someone asked if it was possible to make speaker mounting brackets for the rear bags of the Vaquero. Well, I can tell you that it is as I have designed some to fit the 6.5" speakers! From what I can tell the 2009 and up Vaquero shares the same bag as the 1500 & 1600 Nomad so these should be compatible with all of these bikes. Sorry for the 1700 Nomad and Voyager guys (including myself) as these will be incompatible. They will only fit the side-open hardbags. Sorry that the Vaquero bags are not a direct bolt-on to the Voyager – I already tried that, lol! I am working on getting some pics uploaded but I have been excited to reveal these for some time. A couple select individuals have seen them as I requested some feedback. The prototype has been mounted to a Nomad bag. I created a how-to video along the way and I hope to have the uploaded early this week. Not only will it show how this is done it should allow those on the fence to see it is actually pretty easy install – although permanent! There will be a presale in order to start making these mounts so stay tuned for more information as I roll this out over the next couple of days! Subscribe now!! Login or Register to Remove Ads |

|
|
03-28-2016, 05:27 PM
|
#2 |
|
Member
Join Date: Feb 2014
Posts: 80
|
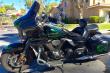
I think it's time for some photos. I will begin with the first "final" prototype which basically means it was the first set that fit the contour. I could bore you with tons of photos leading up to this point but this was the set that was dialed in.
 The next few photos will be from the installation process.   I actually tried mounting the Nomad bag to the Voyager! I had no idea the mounting systems aren't even close! So you'll have to ignore the red strap. Yes, I bought this bag off eBay so it had road rash already but it served its purpose for this project!  
Last edited by OhioVoyager; 03-28-2016 at 10:21 PM.
|
|
|
|
03-28-2016, 05:28 PM
|
#3 |
|
Member
Join Date: Feb 2014
Posts: 80
|
More photos! These photos show more detail such as how the mount angles the speaker back toward the driver. For reference my son is 6'2"/235. The photos also show that because the mount raises the speaker it has little impact on the storage volume. The design was made so it pulls the speaker out of the bag just enough to angle it back toward the driver while not being a big bulky adapter!
   A few closeups of detail.  
Last edited by OhioVoyager; 03-28-2016 at 10:31 PM.
|
|
|
|
03-28-2016, 05:28 PM
|
#4 |
|
Member
Join Date: Feb 2014
Posts: 80
|
This project started out as a question back about Christmas time if I was able to design something for this spot on the Vaquero bags. It was even asked if I could tilt them back toward the driver and lift them just a little in order to leave ample space inside the bag. I think I satisfied all of those requests.
These mounts were actually very solid when I mounted them, even as a two-piece design. They are a two-piece due to the limitations of my printer. I feel that their location subjects them to more vibration and abuse than the fairing mounts so I intend to make these a one-piece design. Just to clarify, that means that the OUTER ring will be one full ring, not split in half like the prototype. The inner ring may or may not be a single ring. It may be advantageous to leave it as a two-piece so I can print them in another printer (i.e. get these out faster  )! More on that goal in a bit. )! More on that goal in a bit.To get there, I need to purchase a larger printer! I have calculated that I need 18 prepaid sales so that I can order it. I already have 3 within the first day so we are off to a great start! This is the old-school “go fund me” before such websites existed. Once the presale minimum is reached I will purchase the printer I need. These are not as “plug n play” as the market would have you believe so I plan to have a few weeks of trials to get everything dialed in. This may mean minor changes to the model, print speeds, infill, materials, slicers, etc, etc. Assuming I can get successful prints I will begin delivering in the order of payment. I state “assuming I can get successful prints” for a reason. There’s a lot of factors that go into this and while I am confident I can make a one-piece design it’s possible I may have severe warpage or other unforeseen issues that will prohibit me from making them as a one-piece. I will do everything in my power to make that a success but I need to reserve the right to make these a two-piece design should I fail with the one piece! You will want to know which speakers you intend to use when you order. With the added stress of this location I feel it is important that the mounts have threaded inserts for the speakers. Each mount (outer ring) will have brass threaded inserts to accept screws for the speakers. This means the screws included the speakers will not work. The semi-universal design of the fairing mounts allow for 4, 5 or 6-bolt speakers to be mounted. Placing 15 threaded inserts into each mount to accomplish the same thing for the bag mounts is impractical. Therefore, I will only insert the exact number of thread inserts necessary and will print each mount accordingly. In other words, a 4-bolt mount will only have those four holes and thread inserts installed. A 5-bolt will have five holes, five inserts, etc. The 4-bolt is, by far, the most popular mount used in the fairing adapters. Therefore, the 4-bolt will be the “standard” bag mount layout. During the presale only – you can order any bolt configuration for the same price. I will be adding a setup fee to use 5-bolt or 6-bolt speakers in the future. These will be sold as a kit! The kit cost for presale is $185 plus $9 shipping to CONUS. That may or may not be the price after the presale but I need to get a base to work with. I am estimating July for the first shipment but it could be June or August. If I get presales in two days it could be as early as May! The kit will include the following (and I will get pics for you): - 2x - Outer mount to accept 6.5” speaker, hole configuration of your choice ---- Includes brass thread inserts already in place - 2x - Inner mount ring - 2x – O-rings - 12x – ¼-20 mounting bolts - 12x – ¼-20 nuts - 12x – ¼ lockwashers - 8x – speaker mounting screws (10x or 12x if you order the 5 or 6 bolt) - 2x – rubber grommet - Template - Instructions These will fit the same speakers as my fairing adapters: - Infinity Reference m612 (5 bolt) - Rockford Forsgate RM0642B/RM1652B - Kenwood KFC-1653MRG (6 bolt) - Kicker 40CS654 - Polk MM651 - Polk db651 - Polk db651 UM (must remove rear speaker cone) I would recommend a gasket or RTV seal between the speaker and the mount to keep out moisture. Vaquero owners will only need wiring to reach from the bag to under the seat where the rear speaker connectors already exist. Nomad owners likely do not have a sound system and will need to install everything else. I appreciate you taking the time to read all of this. If you still have questions please let me know. I think anyone who has purchased my fairing mounts can tell you I'm a fair guy and easy to work with so you need not worry about your investment. I appreciate guys spending their hard-earned on something I created! Thank you, Ohio Voyager
Last edited by OhioVoyager; 03-29-2016 at 06:25 PM.
|
|
|
|
03-28-2016, 06:30 PM
|
#5 |
|
Sr. Member
Join Date: Jan 2012
Location: St. Pauls, NC
Posts: 2,089
|
I'm interested in seeing this setup.
__________________
Robert Torrey VBA# 02077 Vroc# 27672 1996 800A Customized (SOLD) 2001 1500 Nomad (The Mistress) 2013 Voyager  2014 SE Rally - Elkins, WV 2016 SE Rally - Helen, Ga Login or Register to Remove Ads |
|
|
|
03-29-2016, 10:00 AM
|
#6 |
|
Member
Join Date: Jun 2011
Location: Florida
Posts: 309
|
All I can say Randy is this is not fair. I just had my ecu reflashed.
__________________
 2012 Vaquero 1700 Nomad (Deceased) Cobra Tri-Ovals Racnrays Invention (Throttle Mod) Ivan's flash Thunder Tornado Big Air Kit |
|
|
|
03-29-2016, 11:08 AM
|
#7 | |
|
Advanced Member

Join Date: Oct 2014
Location: South Florida
Posts: 710
|
Quote:
__________________
2004 Vulcan 1500 Classic "Sasha" (SOLD)  2014 Vulcan Vaquero ABS SE "Candie" On the 1500, too much to list. On the Vaquero: V&H slash cut slip ons Power Commander 5 and Ivan-ized ECU Chuckster's BAK Aux Audio adapter with bluetooth receiver. Mustang 2 up Touring Seat w/ driver and passenger backrest Kuryakyn Longhorn highway pegs. Kawasaki 12 volt charger Longer 1600 meanstreak SE kickstand Full LED Daymaker light mod. |
|
|
|
|
03-29-2016, 11:29 AM
|
#8 | |
|
Member
Join Date: Feb 2014
Posts: 80
|
Ken! I thought you were more adventurous than that!!
Quote:
|
|
|
|
|
03-29-2016, 11:30 AM
|
#9 | |
|
Member
Join Date: Jun 2011
Location: Florida
Posts: 309
|
Quote:
__________________
2012 Vaquero 1700 Nomad (Deceased) Cobra Tri-Ovals Racnrays Invention (Throttle Mod) Ivan's flash Thunder Tornado Big Air Kit |
|
|
|
|
03-29-2016, 11:54 AM
|
#10 |
|
Advanced Member
Join Date: Nov 2015
Location: Vaudreuil, QC, Canada
Posts: 623
|
Looks good! nice job!
__________________
 1984 shadow 750 - R.I.P. 2004 vstar classic 1100 - traded for my first born 2006 Nomad 1600, black Batwing fairing with full stereo Vance & Hines dual baggers |
|
|
|
03-29-2016, 12:25 PM
|
#11 |
|
Member
Join Date: Sep 2013
Posts: 86
|
looks awesome!
__________________
CaptKurt Secretary Temecula Valley Vulcan Riders, chapter 1-22 2014 Vulcan 1700 Wind Therapy "Vaqueroger" Vaquero ABS - KlockWerks 9" shield, RacynRay ISO Grips, Luverne Kawi Lowering Kit; Vance & Hines Exhaust; Thunder Mfg intake; Ivan's ECU Flash; Mustang Wide Touring Saddle; XM/iPod adapters; Voyager trunk on Wompass Rack; Randy's 6.5" adapters; Rockford Fosgate amp; Polk Audio speakers; custom painted by Kevin Norton. |
|
|
|
03-29-2016, 12:39 PM
|
#12 | |
|
Advanced Member
Join Date: Oct 2014
Location: South Florida
Posts: 710
|
Quote:

__________________
2004 Vulcan 1500 Classic "Sasha" (SOLD) 2014 Vulcan Vaquero ABS SE "Candie" On the 1500, too much to list. On the Vaquero: V&H slash cut slip ons Power Commander 5 and Ivan-ized ECU Chuckster's BAK Aux Audio adapter with bluetooth receiver. Mustang 2 up Touring Seat w/ driver and passenger backrest Kuryakyn Longhorn highway pegs. Kawasaki 12 volt charger Longer 1600 meanstreak SE kickstand Full LED Daymaker light mod. |
|
|
|
|
03-29-2016, 12:57 PM
|
#13 | |
|
Advanced Member

Join Date: Sep 2015
Posts: 542
|
Hmmmm, I remember you saying I was crazy for proposing and asking if you would be making some for the rear bags...
 Quote:
|
|
|
|
|
03-29-2016, 01:26 PM
|
#14 |
|
Member

Join Date: Jan 2014
Location: Round Rock, Tx.
Posts: 493
|
My biggest question is, will they leak in the rain? I ride rain or shine, and even camp in inclement weather, so I need to know if my stuff will get wet.
__________________
1997 KZ1000 Police 2003 Kawasaki Z1000 w/ 149k mi (sold) (un-sold!) 2013 Vaquero in Green (the fastest color) Thunder Mfg Prototype Hi Performance Kit Rev 2 109 cid Klockwerks Windshield Corbin Young Gun Throttle Mod Freedom Performance 2-1 Roarin Toyz Intake PCV with AutoTune Ivanized ECU |
|
|
|
03-29-2016, 01:31 PM
|
#15 | |
|
Member
Join Date: Feb 2014
Posts: 80
|
"no one is going to want to cut into their bags" I said, lol!! Then a bunch of guys said "Hey, you make an adapter and I'll cut the bags!"
Quote:
|
|
|
|


 Linear Mode
